Blog


A steering wheel knob is a compact accessory that attaches to a vehicle’s steering wheel, allowing the driver to steer more easily with one hand. Also known as a spinner knob or brodie knob, it is especially helpful for maneuvering large vehicles, making tight turns, or driving long distances with minimal effort.
Using a steering wheel knob offers several key benefits. It enhances control by enabling quicker and smoother steering and helps reduce driver fatigue, particularly for trucks, vans, forklifts, and tractors. It also makes parking in tight spaces much easier.
However, to enjoy these advantages, proper installation is essential. A poorly secured knob can slip or detach during use, posing serious safety risks. Following correct installation steps ensures maximum performance, durability, and safety, giving you greater confidence behind the wheel.
Before starting the installation, gather the necessary tools to ensure a smooth and efficient process:
Preparing these items in advance will streamline the installation and help you achieve a secure, professional finish.
Start by thinking about your dominant hand and driving style. Right-handed drivers often prefer the upper left or right of the wheel, while left-handed drivers might choose differently. Select a position where steering feels natural and comfortable with one hand.
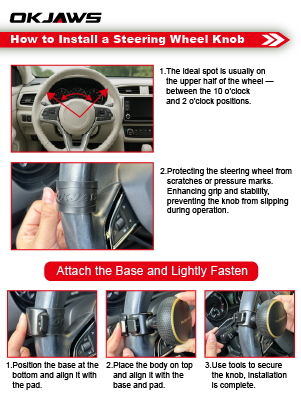
The ideal spot is usually on the upper half of the wheel — between the 10 o’clock and 2 o’clock positions. This offers better leverage and easy access without interfering with dashboard controls.
Before securing anything, hold the knob in several locations and simulate normal driving motions. This ensures that the chosen spot feels natural and doesn’t strain your wrist or arm during use.
Rubber pads serve two functions:
Inspect your steering wheel:
Lightly position the knob first; if it feels slippery or unstable, adding the rubber pad is recommended for a better, longer-lasting fit.
Carefully set the upper part of the knob on the chosen spot. Ensure it sits flat and securely. If using a rubber pad, place it between the knob and the steering wheel.
Proper positioning at this stage ensures comfortable operation and long-term stability.
Position the lower base beneath the steering wheel, matching it to the upper part. The steering wheel should be sandwiched evenly between them.
Insert the screws into the designated holes and lightly tighten them using your fingers or the hex wrench. Do not fully tighten yet—light fastening allows you to make fine adjustments.
Double-check the knob’s position after lightly fastening:
Making adjustments at this point is easier than correcting mistakes after full tightening.
Using the hex wrench, gradually tighten all screws until the knob is firmly secured. Tighten both sides evenly to ensure a stable and balanced fit.
Tighten screws a little at a time, alternating between them. This prevents uneven pressure and ensures a secure, aligned installation.
After tightening, grip and rotate the knob firmly. It should stay solid with no slipping or shifting. If any movement is detected, loosen and realign before retightening.
Before driving, perform a thorough test:
After installation, monitor the knob’s tightness periodically:
Installing a steering wheel knob is a straightforward process that brings significant improvements to steering control and driving comfort. By carefully choosing the installation spot, deciding on rubber pad use, positioning the knob correctly, fastening the bases properly, and performing final safety checks, you can ensure a professional and secure installation.
Correct installation maximizes the knob’s benefits — from easier maneuvering to reduced fatigue — while ensuring long-term safety. Taking a few extra minutes to double-check placement and tighten screws properly makes all the difference, giving you greater confidence and control every time you drive. With the right installation, your steering wheel knob will become a reliable and valuable tool for smoother, safer journeys.
You May Also Want To Know
Why Okjaws Steering Knobs Stay Smooth Even After 80°C Heat Exposure
From Molding to the Road: How Okjaws Guarantees 1000+ Hours of Real-World Steering Knob Reliability
Behind the Print: How Okjaws Ensures Long-Lasting Logo Branding with Pad Printing
Inside the Okjaws Steering Wheel Knob: How Bearings Boost Performance
Why Okjaws Uses Zinc Alloy for Steering Wheel Knobs: A Look into Quality, Safety, and Durability
This site uses cookies to improve your browsing experience. we’ll assume you’re OK to continue. If you want to read more about this, please click PRIVACY thank you.